DO meter calibration
Calibration of the DO meter is arguably the most critical aspect of BOD testing, since we measure the consumption of dissolved oxygen (DO). While calibration may be the center of the DO measurement universe, calibration is in turn impacted by both temperature and barometric pressure.
Understanding the relationship between pressure, temperature and oxygen saturation is critical in consistently obtaining quality BOD data. In the absence of this understanding, we encounter problems with supersaturation and blanks.
affect calibration. Accurate calibration
is critical to obtaining quality data.
Supersaturation
- Sample initial DO > saturation point (defined by temperature & pressure).
Blanks
- Blanks can — and typically do — fail simply due to calibration problems.
- Atmospheric pressure changes, including both low- and high-pressure systems can significantly affect blank results over the five-day incubation period.
PRESSURE ADJUSTMENTS
Typically, any barometric pressure measurement that you hear (radio, TV) represents a value that has been corrected to a value relative to sea level. Why is this? For one thing, it's a means of standardizing data. Barometric pressures are typically similar for a very large regional area, unless a storm is approaching, but there are pressure differences based on altitude, which can change dramatically over a very small distance.
To determine true, uncorrected barometric pressure:
- Obtain barometric pressure directly from your own mercury barometer. If you are using an aneroid barometer (typically have a tightly coiled spring), make sure it has been adjusted to read true uncorrected barometric pressure.
- or call a local airport or check a weather internet site
- Ask if their data is "corrected" (to sea level)
- If it is corrected, you need to UNcorrect it,
- Otherwise you can use it as is.
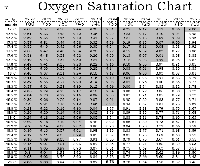
- Use known O2 saturation tables to determine the saturation point
UNCORRECTING PRESSURE READINGS
The local airport provides you with a "corrected" barometric pressure of 29.65 [inches of Hg]. To UNcorrect this measurement:
NOTE: Pressure drops by 26 millimeters (mm, about 1 inch) for every 1000 feet above sea level.
26 ÷ 1000= 0.026. That's why during the process, we multiply the altitude in feet by 0.026.
- Determine the altitude (in feet) of your facility/lab (you can use the altitude of the city/town/village). Wastewater treatment plants can usually obtain this information off the plant blueprints. Otherwise, the internet is a resource which can help you quickly find altitude.
- Determine the correction factor (CF):
CF = [760 - (Altitude x 0.026)] ÷ 760
= [760 - (600 x 0.026)] ÷ 760
= [760-15.6 ] ÷ 760
= 744.4 ÷ 760 = 0.9795
Therefore, true uncorrected barometric pressure = 29.65 x 0.9795 = 29.04 - Convert inches of mercury (Hg) to mm of mercury (Hg):
inches of Hg X 25.4 = mm of Hg
Therefore 29.04 X 25.4 = 737.6
Set your barometer to read either 29.04 inches or 737.6 mm
DETERMINING DO SATURATION POINT
DETERMINING SATURATION POINT WITH AN "UNCORRECTED" CHART
- We know the temperature of the calibration solution is 20.5 °C.
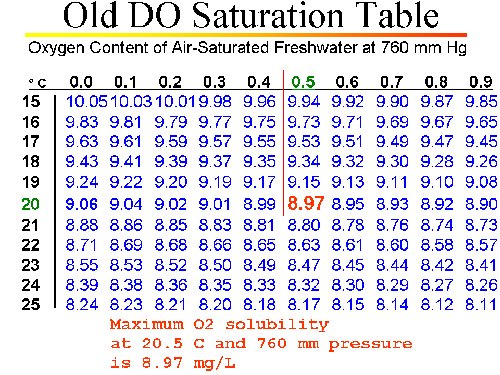
- We know (from conventional DO Saturation Table) the maximum O2 solubility (mg/L) at 20.5 °C at SEA LEVEL and standard pressure is: 8.97 mg/L
- We know the true uncorrected barometric pressure (TUBP) is 727.5 mm Hg.
- Determine the correction factor to adjust maximum O2 saturation to the actual pressure:
- Correction Factor = [TUBP ÷ 760]
- = (727.5 ÷ 760)
- = 0.9572
- Multiply the sea level saturation point by the correction factor:
- [Max O2 Sat. from table] X Correction Factor
- = 8.97 x 0.9572 = 8.59 mg/L
DETERMINING SATURATION POINT WITH A "CORRECTED" CHART
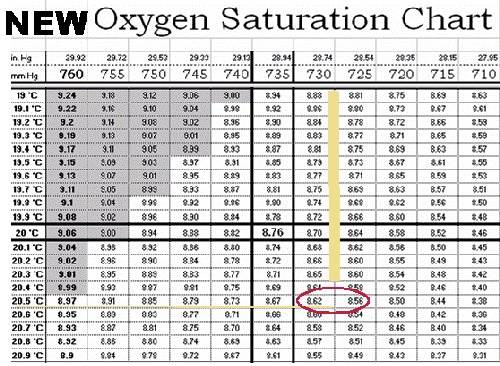
Once you have the true uncorrected barometric pressure, either directly from your barometer or corrected from a local source, determine the Oxygen solubility at that pressure and temperature.
- Determine the true uncorrected barometric pressure: 737.6 mm or 29.04 inches (from the previous section)
- Determine the temperature of the calibration solution: 20.5 °C.
- Use O2 saturation table to obtain the maximum O2 solubility (mg/L) at that temperature.
- The Corrected DO Saturation Table gives data based on pressure increments of 5 mm (0.2") and tenths of a degree C. You may have to interpolate, or estimate, the saturation point if the actual pressure falls between two column values. In this example, the actual true uncorrected barometric pressure of 727.5 mm falls between the table columns headed by 725 mm and 730 mm. In fact, it's exactly halfway between the two. Therefore, if you look across from the 20.5° C row to these two columns, you find saturation values of 8.56 mg/L (725 mm) and 8.62 mg/L (730 mm). Therefore, the saturation point for a pressure of 727.5 mm and 20.5° C is halfway between these two values, or 8.59 mg/L.
CALIBRATION - PUTTING IT INTO PERSPECTIVE
| Low Pressure | Normal | High Pressure | |
|---|---|---|---|
| Sea level | 750 mm (29.58") | 760 mm (29.98") | 770 mm (30.38" |
| 1000 ft altitude | 724 mm (28.56") | 734 mm (28.95") | 744 mm (29.35") |
- Pressure drops 26 mm Hg (~ 1.0 inches) every 1000 ft
- Maximum DO saturation drops roughly 0.3 mg/L each 1000 ft
- Barring abnormal storm systems, daily pressures fluctuate roughly ± 10 mm (0.4 inches)
- Around 20°C, saturation point drops about 0.1 mg/L for each 0.5 degree rise in temperature
With the advent of DO meters containing "on-board" barometers, many of these issues are beginning to disappear. Nevertheless, it is important for people to understand how important pressure changes are in the calibration process. Remember that historically, operators were provided with a very simplistic chart of DO saturation based on temperature and a correction factor based on altitude was employed. This approach gave no consideration to pressure changes as the saturation table was based on standard pressure at sea level (760 mm).
Remember: you calibrate on day 0 AND day 5.
- What if samples go in under a low pressure, but come out under a high?
- What if samples go in under a high pressure, but come out under a low?
WHY SATURATE YOUR DILUTION WATER BEFORE CALIBRATION?
- It provides a known standard to evaluate calibration:
- If you know the temperature is 20.5°C...
- ...and you know the barometric pressure is 740 mm Hg (29.13 inches)...
- ...and you know you shook the solution vigorously, then the solution MUST measure 8.73 mg/L (laws of physics are in play)
- If the meter registers a substantially different value, you know to initiate corrective action.
- It establishes the point at which supersaturation occurs:
- Again, if you KNOW the temperature is 20.5°C...
- ...and you know the barometric pressure is 740 mm Hg (29.13 inches)...
- Then if your sample DOI (at 20.5°C) measures 9.5 mg/L (or any value greater than 8.73 mg/L), suspect supersaturation.
PRESSURE CONSIDERATIONS - OTHER ALTITUDES
If your lab is located:
- in Denver, CO (elevation 5280 ft)
-
- Average barometric pressure = 24.7 inches
- Maximum O2 saturation, 20oC = 7.48 mg/L
- ...and you're working DO range for samples would be 7.48 − 1 = 6.48 mg/L
- on Pike's Peak (CO) (elevation 14197 ft)
-
- Average barometric pressure = 15.47 inches
- Maximum O2 saturation, 20oC = 4.68 mg/L
- ...and you're working DO range for samples would be 4.68 − 1 = 3.68 mg/L
NOTE: since GGA typically uses up about 4.0 mg/L of oxygen, one could not even obtain an acceptable GGA as the final DO would be less than 1.0 mg/L!!!
- on Mount Everest (elevation 29028 ft)
-
- Average pressure = 0.20 inches
- Maximum O2 saturation, 20oC = 0.06 mg/L
- If you're even thinking of setting up BODs here, your brain is already suffering from hypoxia.
CALIBRATION - FINAL THOUGHTS
- Calibrate your barometer
- Most aneroid barometers need to be calibrated initially
- Set it against true uncorrected local barometric pressure
- Know what represents reasonable barometer readings
- Normal is 29.9; range ~29.6 - 30.2 inches Hg (752-767 mm Hg)… at SEA LEVEL!
- If you are in Merrill, for example, at 1300 ft. altitude, this range changes
- Rarely (at sea level) do readings exceed 30.4 inches Hg (773 mm Hg)…except for occasional arctic highs in January.
- Rarely (at sea level) do readings fall below 29.5 inches Hg (749 mm Hg)…except for occasional severe low pressure storm systems.
- Pressure really does affect results
- November 10, 1998; major Wisconsin low pressure system
- Pressure readings as low as 28.5 inches Hg (724 mm Hg)...that's corrected to sea level! (Which would make them about 27.5 inches/700 mm in most areas of Wisconsin.
- Amounts to a change in maximum O2 solubility of 0.4 mg/L
- Local labs reported an inability to obtain a stable DO reading; "the meter just kept dropping"
A word about Winkler
Winkler remains the "gold" standard of calibration techniques. Winkler is based on chemistry, which means, as long as your reagents are fresh and prepared properly and accurately, your calibration will be accurate. We do see differences when Winkler is compared to Probe technology, but the differences are in absolute DO measurements; critical QC results are the same.
Winkler was, at one point, the best available calibration technique. The reality is, however, that advances in probe technology combined with the simple fact that Winkler calibration is time and labor intensive, are slowly contributing to Winkler's demise. Certainly, if Winkler works for you, and you have the time required, by all means continue to use it. Alternatively, rest assured that you can obtain consistent and reliable calibrations using a DO probe.
The keys to successful Winkler calibration are:
- be sure that dilution water is air saturated;
- use fresh reagents;
- standardize titrant;
- perform Winkler titration;
- check Winkler result against theoretical saturation;
- set meter; and
- document your procedure.
samples must be treated exactly
as calibration
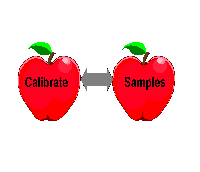
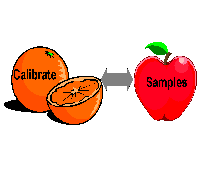
Apples to apples or Apples to oranges
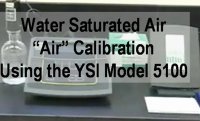
For many years, we have referred to WSA calibration as a case of "apples to oranges" since the probe sits in air for calibration but is immersed in sample (or dilution water) during sample analysis. This is distinctly different from the WATER (saturated air) calibration in which the probe is always immersed in sample (or dilution water). Historically, this difference has been the root cause of many a blank failure.
At the heart of this issue is physics. We know we can easily saturate water with oxygen by simply shaking the water in an environment that offers sufficient exposure to oxygen in the air. This is best accomplished using a large container which is half full of dilution water, offering sufficient headspace for air (and thus oxygen). Maintaining a water-saturated air (WSA) environment, however, is a far more difficult proposition.
Consider an air calibration performed in the winter. It's quite possible that the atmosphere in a BOD bottle containing a little water, and sealed with the probe, represents 100% saturation (100% relative humidity). This is usually evidenced by the formation of condensation droplets on the probe tip. What's the first thing you do? Remove the probe from the bottle and either shake or wipe off the probe tip to remove the drops? Of course, but what have you done to the water saturated air in the bottle? If your lab is like most, the room air likely has a humidity of about 50% (or less). Removing the probe from the bottle causes a draft effect, which pulls the water-saturated air out of the bottle to be replaced by air of much lower relative humidity.
samples and calibration are treated
differently - the probe is in air for
calibration, but submersed for
sample analysis
Now comes the physics lesson. So you seal up the bottle again by replacing the probe. Physics pop quiz time: How long does it take for the air in the bottle to become saturated with water again. Here's a tip, it doesn't occur in just a few minutes. Frankly, this "passive saturation" can take hours, depending on barometric pressure, the room temperature, the amount of water in the bottle and the amount of headspace of the bottle (i.e., physics). Bottom line: There are just too many variables, and that's exactly why your blanks can deplete 0.3 mg/L one day and "create" 0.3 mg/L the next day. That's why we haven't been huge fans of WSA calibration. But things are changing - technology is improving.
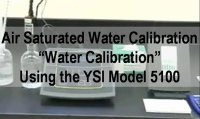
Update on ASW Calibration: With the introduction of the luminescence technology (RDO, LDO), we have observed far fewer calibration problems related to WSA (probe in air) calibration. We maintain, however, that if you do experience calibration problems, the ASW calibration approach is both valid and represents an "apple to apples" situation.
Chemists at the State Lab of Hygiene performed AIR and WATER calibrations in succession with the same sample, DO meter and probe. They noted that the AIR calibration result was higher by 0.15 mg/L (8.68 vs. 8.53). Note that 8.68 divided by 1.023 equals 8.48, which represents the true saturation of oxygen at 742 mm pressure and 22.2° C. The factor 1.023 (102.3%) represents a correction factor used to adjust results obtained following AIR calibration to account for difference in temperature equilibration time. The calibration for new technology (dual thermistor) probes is 102.3% and 101.7% for older polarographic probes.
Bottom line: the value shown after air calibration will be slightly high but will read correctly if immediately placed in water.
Common sources of error in the water-saturated air (WSA) calibration
- Temperature: Thermistor must equilibrate to air temperature in the BOD bottle before calibration. It takes time for the probe equilibrate initially after removing the droplets from the tip. It also takes longer to equilibrate in air than water. That's why some have more success with the ASW approach.
- Not allowing the air to become saturated with water — it takes at least 30 minutes.
- Not allowing the meter and probe to warm-up for at least 30 minutes.
- Poor DO probe maintenance
- not changing the membrane regularly,
- failure to inspect and remove sulfide deposits from anode & cathode.
- Neglecting to check (and possibly re-calibrate) the on-board barometer.
Keys to successful water-saturated air (WSA) calibration
Your calibrations will likely work even if you don't wait for the air to be 100% saturated with water as long as you do your calibration the same everyday.
- Consistency is the key.
- Meter warm up time (at least 30 mins).
- How droplets removed from the probe tip (shake or dab).
- Amount of water in the BOD bottle (~1 inch).
- How long you let the probe sit in the BOD bottle or the calibration chamber before calibration (≥30 minutes).
- Consistent temperature conditions in lab.
- Must be consistent from day zero to day five.
- Get into a routine and stick with it.
- How important is consistency?
One operator's SOP for consistency
- 30-minute warm-up for meter.
- Allow one-hour in bottle after wiping probe tip.
- New membrane every two weeks.
- Result: Has successfully met blank requirements for several years.
Source: Joe Flannigan, Blanchardville Wastewater Treatment Plant; former Lab-of-the-Year winner.
Conclusions: air (WSA) vs. water (ASW) calibration
- There is a difference when calibrating in air vs. measuring samples in water.
- Manufacturers often program a correction factor to account for the difference between oxygen diffusion in air vs. water.
- This is often seen as a saturation of 102.3 percent (polarographic) when calibrating in air vs. calibrating in water.
- Whatever works, is the best technique.
Correct calibration protocols
Water-saturated air (WSA)
to calibrate by the ASW protocol.
- Place the probe in a BOD bottle containing about 3 cm of water.
- Shake BOD bottle prior to inserting probe to assure saturation. We recommend leaving the stirrer on (although manufacturer says it's not necessary) — it speeds up equilibration.
- The probe may need to sit in the bottle for 30-35 minutes in order to match the temperature of the air.
- Determine barometric pressure and adjust meter's internal barometer as necessary.
- Check the temperature of the air (in the bottle) to be sure the probe thermistor is working correctly.
- Use the meter's auto-calibration function to calibrate the probe and meter.
Air-saturated water (ASW)
to calibrate by the WSA protocol.
- Place the probe in a BOD bottle filled with air-saturated (well-shaken) water.
- Leave probe in the water with stirrer operating long enough for the probe temperature to equalize with the water temperature.
- Determine barometric pressure and adjust meters internal barometer as necessary.
- Check the temperature of source water to be sure the probe thermistor is working correctly.
- Use a detailed DO saturation table to determine the theoretical DO concentration.
- Adjust the meter to read the DO concentration determined from the saturation table.
Summary of calibration techniques
- The Winkler calibration takes longer than the other calibration techniques with no net gain in quality.
- Calibration with air-saturated water takes less time because the probe's temperature equilibrates quicker in water than air. This is because water is a more effective heat sink than air.
- You don't have to worry about dealing with droplets on the probe tip when calibrating in air-saturated water.
- All three methods work. The results of the seed control and GGA were the same even though the IDOs and DOs were different.
- Consistency is the key to good results regardless of calibration technique.
- Whatever works for you, is the best technique.
How to know DO measurements are accurate
In order to know DO measurements are accurate, you need a "known" standard. If you have a standard which you know to be a specified dissolved oxygen concentration, and you measure that standard and obtain a reading equal to (or acceptably close to) that true value, then you have documentation to support the ability to obtain accurate measurements.
We also understand that labs have many QC responsibilities already, so the best part of all this is that you can analyze a known standard without having to add any additional analyses. This is because, the initial DO reading of your calibration blank is a known standard.
Remember: Pressure ± 5 mm translates to ± 0.06 mg/L DO.
Temperature ± 0.5 °C translates to ± 0.1 mg/L DO.
Summary of process
- Prepare air-saturated (by shaking) dilution water.
- Get some basic physical data.
- Temperature
- Absolute barometric pressure
- Compare apples to apples. Has the pressure value been corrected to sea level (most are)? If so, you'll need to "uncorrect" it.
- Make adjustments as necessary.
- Use physical data to determine standard "true" value (use a DO saturation table).
- Determine theoretical true value for oxygen in mg/L (i.e., saturation point).
- If measured value = True value ± 0.2 mg/L; calibration is accurate.

